Choice daylilies for Northern Gardens
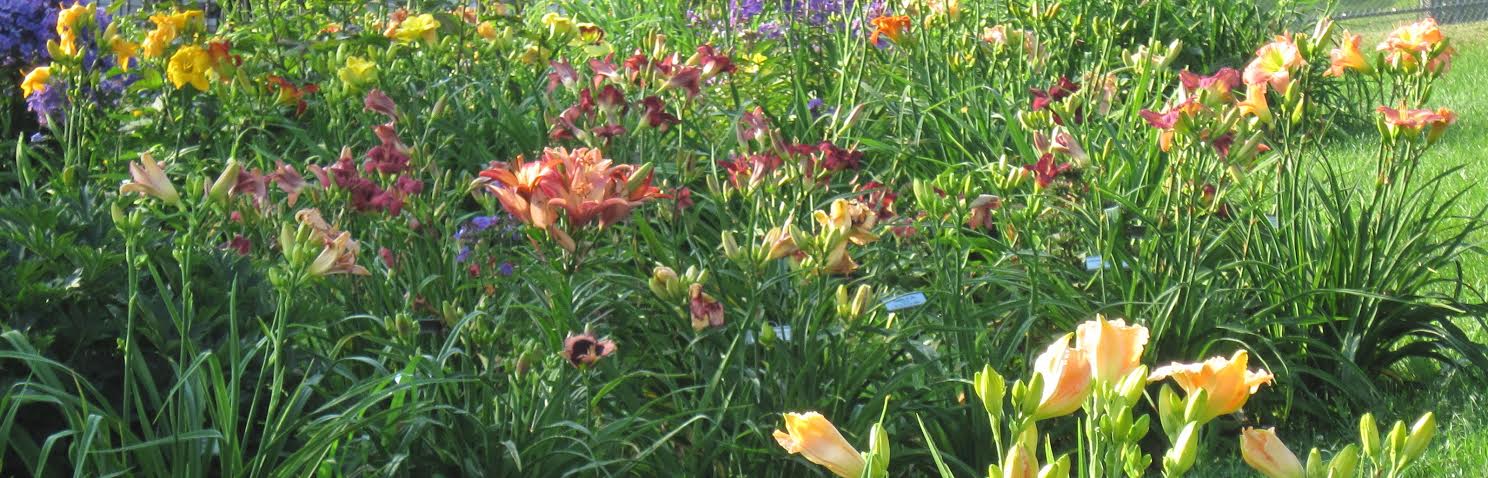
| Growing Daylilies:Daylilies are often called the perfect perennial. They are hardy, vigorous, long-lived, not fussy about soil type, relatively untroubled by pests and diseases and of course beautiful. Provide them with at least 6 hours of sun daily, well-drained soil enriched with organic matter, a little bit of fertilizer and adequate moisture and you will be rewarded by performance to their full potential. They will bloom happily in an undisturbed clump for years; however, if you want more they are easily divided almost anytime during the growing season. The plants offered here need no winter protection to survive in our Central New York climate. In fact, a good snow cover is beneficial!PLANTING OF YOUR NEW DAYLILIESFreshly dug: If your plants were dug on demand, simply plant them the day you receive them as shown below. If you need to delay planting for more than a day or two wrap the roots loosely in slightly damp newspaper and store in a cool, shaded place. They'll be fine for a week or so this way. It's advisable to trim the leaves back by one half at planting. New growth will quickly appear from the center. Plant as shown below.Bareroot plants that have been washed, dried and trimmed may be kept for up to week in a cool shaded location. Before planting you may soak them for a few hours in a bucket of tepid water or a weak solution of liquid fertilizer. While not necessary, in my experience this helps them get off to a good start. Plant as shown below. Pots: Daylily roots grow quickly and may begin to circle the container fairly soon after potting. Keep your potted daylily well watered until ready to plant. Knock the plant from the pot and gently untangle and straighten roots so they will drape over mounded soil as shown below. Work the soil to a depth of one foot and add some organic matter (compost, peat moss, etc.). Dig a hole larger than your plant and make a mound in the center. Set the plant on the mound with roots spread out on all sides and with the crown (where leaves and roots meet) no more than 1 below soil level. Work the soil around and between roots as you cover the plant. Firm the soil and water well to settle soil. Finish filling in the soil, leaving a slight depression around the plant. Keep watered. SPACING:Give plants 24 inches all around and larger varieties 30 or more. They clump up quickly.SITE SELECTIONDaylilies prefer full sun but will tolerate some shade. Choose a spot that will receive a minimum of six hours direct sun daily. Light yellow, pink and delicately colored pastel blooms need full sun to bring out their colors, while darker colored daylilies may actually benefit from partial shade as their blooms absorb heat and don't withstand sun as well. Avoid planting under large broadleaf trees (maples. poplars, birches, etc.) where they'll have to compete for water and nutrients. Also avoid poorly drained areas where standing water may linger-although daylilies thrive with plenty of moisture they resent wet feet. Where drainage is a problem raised beds 3-6 inches above ground level as a solution.SOILDaylilies are not fussy about soil but will perform to their highest potential in well-drained soil amended with organic matter such as compost, leaf mold or peat moss.FEEDINGFertilize lightly with in spring and again after first flowering with compost, alfalfa pellets (yup horse feed) or a low nitrogen fertilizer such as 10-10-10. Too much nitrogen will give you lots of leaves and fewer blooms.DIVIDINGA clump may be left undisturbed for years, but if flowering begins to decline or you simply want more your daylilies are easily divided. The best times to do so are early spring or immediately after flowering. Dig up the entire clump and using your hands, a large screwdriver or the two fork method for larger clumps separate into pieces with two or more fans and replant. Or you may simply take a shovel and remove a section of the plant leaving the parent plant undisturbed.MULCHING, GROOMING AND CLEANUPMulch helps suppress weeds and maintain consistent moisture around roots, keeping them cool. I prefer pine or cedar bark over hardwood, but any organic mulch even straw or dried grass clippings - will do. A depth of 2 is sufficient keep at least 6 around the base of the plant mulch free the dense arching foliage will keep weeds down here anyway.It's optional, but deadheading (removing spent blooms) will keep plants looking neat and prevent unwanted seed pods from forming. It is not necessary to cut down foliage in the fall. Old foliage left over the crown of the plant helps serve as a bit of protection through the winter. It is easily raked off in early spring just as new leaves emerge. 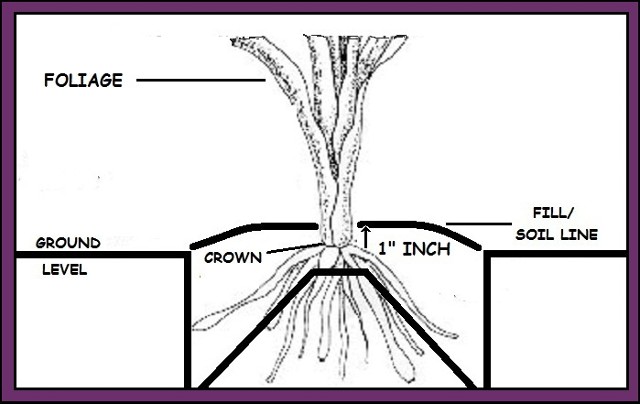 LEARN MORE ABOUT DAYLILIES AND THEIR CARE VISIT THE AMERICAN HEMEROCALLIS SOCIETY WEBSITE AT: DayLilies.org | |||||||